home - Beginners Guide To Understanding And Using A Brownie Box Camera
Beginners Guide To Understanding And Using A Brownie Box Camera
by Peter LutzINTRODUCTION
So you woke up one morning the dubiously proud owner of a box camera. Maybe you've kept it in a closet for years because it once belonged to your favorite great-aunt and you couldn't bear to part with it. Then again, you might have been strolling through an antique shop the other day, not looking for anything in particular, when something vaguely familiar, maybe from your childhood, caught your eye. Without thinking much about it you paid the asking price, probably too much, and took it home.
Now the question is: What are you going to do with it now?
Well, let's assume for the moment that this contraption, primitive as it seems to be, is in good working order. Why not see if you can take some pictures with it? Good idea, you think, but how should you get started?
We'll come back to that question a little later. I promise. First the salt, then the sweet...
BACKGROUND
The box-type camera was developed in the late 19th century and marketed under many names, but most successfully by Eastman Kodak Co. as the "Brownie". George Eastman took the simple operation of the box camera, combined it with a name and an advertising campaign that would appeal to children, sold it for a dollar and made millions. That Eastman was a marketing genius cannot be disputed when faced with the simple fact that most people, when they hear the word "Brownie", will think first of the camera and second, if at all, of the Palmer Cox characters that was its namesake. Hereafter, for simplicity sake, the name "Brownie" will be used when discussing the box camera.
BASIC OPERATION
The Brownie operates under the following sequence of events:
1: A shutter in the front of the camera is opened allowing light to pass through the lens. This light is reflected from the object being photographed.
2: As the light passes through the lens it forms an image of the object being photographed. As it continues through the lens, this image is inverted (turned upside-down).
3: The lens projects the inverted image onto light-sensitive film at the back of the box. This is known as exposure of the film. The longer the shutter is left open, the more light is allowed onto the film.
The operation of the Brownie can be likened to the operation of the human eye, with the camera lens resembling the eye's lens, the shutter resembling the eyelid, and the film resembling the retina. If the Brownie has different apertures, these can be likened to the iris of the eye, which controls the amount of light that transfers to the retina.
FEATURES OF THE BROWNIE
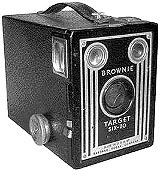
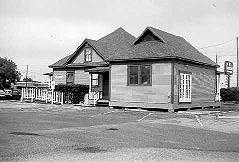
In order to keep the consumer's cost low, the Brownies did not have the "best" lenses, shutters, internal mechanisms, or outer coverings. They were, however, of comparatively high quality for their day, which is why so many of them exist in current collections. A Brownie that was made in the 1940s, for example, if it was attended to under relatively good conditions and kept clean and in working order, may be relied upon to take reasonably sharp, clear pictures in 2001(below right). Many of the following features can be seen below on the camera pictured at left.
LENSES
Most Brownies came with a fixed-focus lens, either meniscus (concave on one side/convex on the other, with light entering from the concave side) or doublet (two lenses of similar construction with the shutter mounted between them). The doublet lens provides a magnifying effect, however slight, that the meniscus cannot duplicate. The term fixed-focus refers to a factory setting, on the Brownies usually from eight feet to infinity, at which sharp pictures could be taken.
Some Brownies came with the "Diway" lens (a brand name by Eastman Kodak Co.). This feature was nothing more than another simple lens that could be dropped down into place with a lever, either in front of or behind the regular lens, to allow picture taking from about five feet to eight feet. The "Diway" may also have been marketed under similar names such as "Bimat" and "Twindar", but these might have referred to lenses of higher or lower quality that performed the same function.
SHUTTERS
In most cases, since simplicity was its greatest feature, the rotary shutter on a Brownie was either a single-speed only, or single-speed with a bulb ("B") - or long ("L") on later models - setting for time exposures. Early Brownies employed a shutter release lever on the lower right-hand-side of the box, whereas later models might have had a push-button. Shutter speeds for the Brownie could be pre-set anywhere from 1/25th to 1/50th of a second.
When using the "bulb" setting it was necessary for the Brownie to be placed on a firm surface to prevent it from being moved during the exposure and the shutter held open manually for the required length of time. Another lever above the shutter release could be pulled out slightly to engage the "bulb" feature, or it might be located somewhere else. On the Brownie Hawkeye, for example, this feature was a slide located on the top left-hand side.
APERTURES
Since the Brownie was by its very nature a camera that anyone could use, lens apertures were also pre-determined by the factory. Some, however, came with a feature that allowed a smaller lens opening to be used, on days with brighter sunshine and so forth. This was engaged by yet another lever located at the top center of the camera's front panel which could be pulled up or pushed down for smaller or larger aperture, respectively.
VIEWFINDERS
Most Brownies had viewfinders with a reflex mirror assembly. Simply put, the camera had a window in front, a window at the top, and an angled mirror inside that connected the two. In order to compose the picture, it was necessary to hold the camera at about waist-level and look down into the finder. Once the subject was composed in the approximate center of the viewfinder, the shutter lever could then be depressed. There were no framing marks in the viewfinder. If the Brownie took square pictures (6 cm x 6 cm), it would have only one center viewfinder; if it took rectangular pictures (6 cm x 9 cm), it would have two finders, one on top and one on the side. In the case of the latter, the top finder was for "portrait" and the side finder for "landscape" pictures.
It is interesting to note here that many Kodak instruction manuals of the period advised the photographer to hold his breath when shooting a picture. This provided a simple method of making sure the camera stayed still during exposure.
CAMERA BODY
The Brownie adapted with the times, for the most part. Early camera bodies were constructed of either metal or leatherette-covered cardboard and were priced to match the construction. Later, with the development of Bakelite and other plastics, construction of the cameras was almost entirely given over to this "new" material, both inside and out, exception being given to lenses and internal shutter mechanisms.
FILM
When the Brownies were first marketed they came in all possible sizes and took all manner of roll films available at the time. Later they were standardized to take either 116 or 120 roll film.
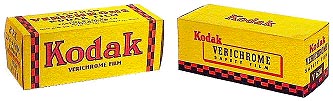
Two types of Kodak films formerly available: 116 (l), and 620 (r).
Courtesy of collection of Walker Mangum.
When in the 1930s Eastman Kodak created 616 and 620 film (essentially the same size film as 116 and 120 but on a modified spool) in an attempt to ensure that Kodak users used only Kodak film, the Brownie designs were altered to take these roll films. Brownies for the most part took rectangular pictures and would get eight exposures on a roll of 616 or 620 film. Some, however, like the Brownie Hawkeye, were available in only the 620 size, and since they produced a square negative (6 cm x 6 cm) would get 12 exposures per roll.
These films were created long before the advent of 35mm film, and were the standard sizes for many years. Though today the most popular film in use, 35mm film, was described as "miniature" film for many years following its introduction in the 1930's.
Some later-model cameras were marketed as "Brownies" but since they took 127 roll film or "cartridge" film in the 126 or 110 sizes, they should not be considered proper "box-type" cameras. They are mentioned here only in passing.
Eastman Kodak and all other film manufacturers had discontinued 616 and 620 film by the 1980s. Since 120 film is still in use as a "professional" film it is widely available, but in order for it to be used easily in a 620 roll film Brownie it must first be re-rolled onto a 620 spool.
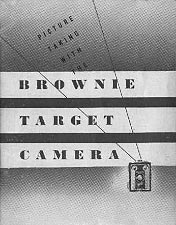
Cover for the Brownie Target Camera Manual.
USING A BROWNIE
Remember at the Introduction when we left off with the question: "How should you get started?" It's time to answer that question now. To begin with, I highly recommend that you acquire the appropriate instruction manual and read it thoroughly.
It is further recommended that you conduct a hands-on inspection of your Brownie. A few minutes spent looking over the features described above, operating the shutter mechanism, testing the "bulb" setting, opening the camera body and removing the film carriage, and so forth, can go a long way toward understanding it.
One practice that could prove invaluable is to keep a roll of black plastic electrical tape close at hand. The red window on the back of the camera is an indicator window when winding the film to the next frame, but with modern films it can be a good idea be keep it covered. A short strip of the tape will perform this service nicely. Briefly lifting the tape - in the shade - to see through the window will not harm the film.
It goes without saying, however, that the most important way to understand it is to USE IT. Buy film, learn how to re-spool it, and push it through the camera. Get used to holding the camera at waist-level and composing your subject in a pleasing manner before holding your breath and pushing the lever. Practice being nicer and more patient with your family, because it will take longer to take their picture.
USE YOUR BROWNIE
Take lots of pictures. Experiment with different speed films, both color and black & white. Go out in the sun or on cloudy days or use existing light indoors. Take it with you on your vacation to the Grand Canyon or the Eastern Seaboard, and USE IT. Re-spool five or ten rolls of film in advance and pack them inside your socks.
The perfect size camera bag for your Brownie is one of those inexpensive padded lunch boxes with a zipper top. It will hold your camera and film, and even leave room for a light snack.
Become a "Junk-Store Junkie" by looking for old cameras that still have the 620 spools inside and buying either the whole camera or just the spools. I have on at least two recent occasions walked out of thrift-stores, grinning like a madman, with as many as five spools clutched in a sweaty fist, having paid as little as $1.00 each.
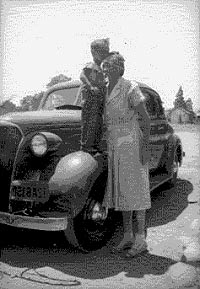
A boy and his grandma, courtesy of Amy Corder.
Chances are your Brownie once belonged to a relative. Maybe your picture was taken with it when you were a child. Even if it didn't and it wasn't, by using it you are connecting with the past, you are recreating history in your own way. The camera you are holding so lovingly in your hands was once cradled in the same way by another living person before you were born. Think about this while you USE YOUR BROWNIE. It may change the way you look at picture-making forever.
About Pete Lutz: Pete was born in the wrong half of the 20th century and tried to make up for it by collecting as many Brownies and old cameras as he could get away with. He is currently not involved in either collecting nor photography, but still loves the idea of it. Pete is spending his free time now as an writer/director/producer of the audio drama podcast series "Pulp-Pourri Theatre", and is formulating a script called 'The Haunted Brownie'.
Find his Pulp-Pourri Theatre podcast on naradaradio.libsyn.com, iTunes and Stitcher.


Back to The Brownie Camera Page
Back to The Brownie Camera Page