home - Converting a 116/616 Box Camera to Shoot 120 Film
Converting A 116/616 Box Camera To Shoot 120 Film
by Peter LutzThose of us who collect and/or use the vintage box cameras are familiar with the models in the 116 (also known as "2A") and 616 sizes. Naturally, we are also well aware that these film sizes are no longer manufactured.
So what's to do with all those oversize box cameras, besides decorating a shelf or using them as paperweights? Well, there is something you can do to convert yours to accept 120 film -- and to get 15 or 16 pictures instead of the normal eight. With just a few simple tools and materials, and a monetary outlay of less than a buck or two, you can be using your old box camera again, or maybe even for the very first time. This also works for folders!
I have converted several cameras (in both 616 and 116 format), and each one was a little different, since some were Kodak box Brownies, another was a Kodak Six-16 Brownie Special, and still others were Agfa boxes and folders. There was a Kodak Jiffy Six-16 in there somewhere, but my very first conversion was a Seneca 2A Box Scout. The film-loading areas are, as you can well imagine, all different on these, i.e., Kodak boxes load at the top and take-up at the bottom, and Agfas are vice-versa. The Brownie Special and Seneca Scout film cones have spring-steel prongs, while both the Agfa and the Kodak film loading chambers are the "drop-in" style. Folders naturally have their own designs, depending on the maker.
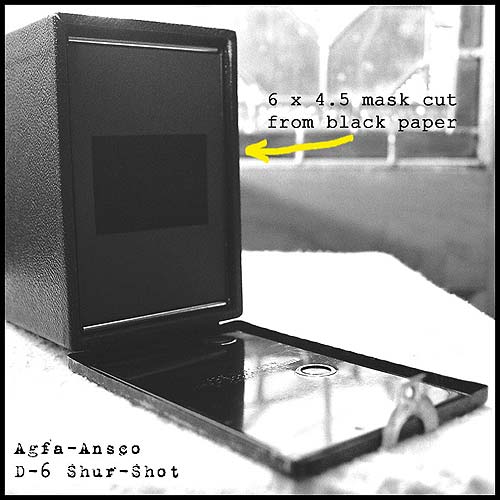
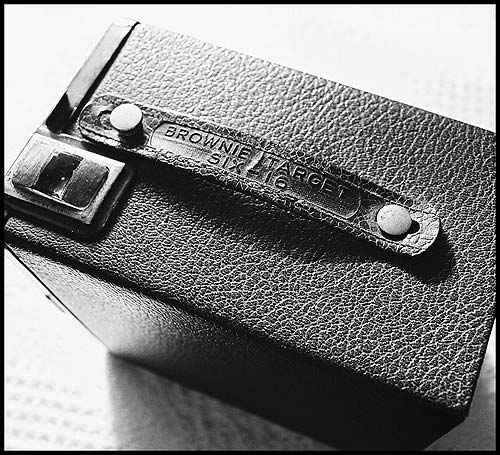
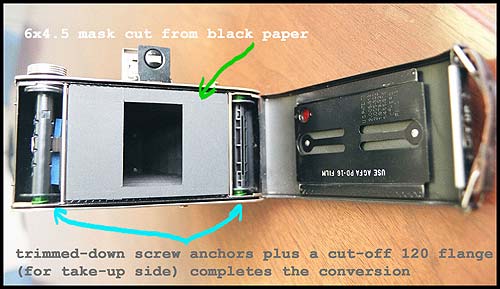
The main conversion feature that is the same in all cases is the 6 x 4.5 cm (or 645) mask that you will make and will install in the film plane. For the sake of convenience I will describe in full how I converted a Kodak Brownie Target Six-16, and at the end I will indicate what will be needed for other types of cameras.
HERE'S WHAT YOU WILL NEED
4 self-adhesive foam rubber pads, used normally for chair legs and such (take a 616 spool with you to the store and find the size that is the same circumference of the 616 flange or close to it). Try to avoid the felt pads, they may release fibers that can get into your film.
Scissors
One-hole paper punch or other type hole punch
Masking tape
1 fine-point Sharpie (preferably black ink)
Standard clear cello tape (not the "magic transparent" type)
1 sheet black card stock or poster board (matte finish)
1 12" ruler (with centimeter markings if possible)
Scissors (or) x-acto knife (or) craft-size (14") cutting board
Pen or pencil
GETTING STARTED: MAKING THE MASK
1. Open your box camera in the standard way and remove the film cone. Set the outer body aside for the nonce and measure the top and one side of the cone's film plane opening.
2. On the black cardstock's long edge, measure out the width of the film plane and draw a vertical line from top to bottom of the paper.
3. From the top of the paper (short edge), measure down about 1" and make a horizontal line across the width of the space you marked off in step 2.
4. From the horizontal line, now measure off the length of the film plane and mark it off with another horizontal line.
5. Measure down another inch from this second horizontal line and mark it off. In this way you will be creating "wings" or tabs that will slide under the film rollers at each end of the film plane.
6. Do not cut the paper yet. From one corner of the film plane area you've marked off, draw a diagonal line to the opposite corner, then repeat this
action on the other side to make an X, and thus find the center of your film plane.
7. I'm going to assume a basic knowledge of ruler usage here and instruct the user to now create a 6 cm x 4.5 cm (2-1/4" x 1-5/8") rectangle in the center of the marked-off area. NOTE: Your rectangle MUST be horizontal to the film plane; in other words, holding the film plane drawing vertically, your new inner rectangle will have its long sides parallel to the drawing's short sides.
8. Using the cutting instrument of your choice, carefully cut out your smaller rectangle, and then cut out the rest of your drawing. Hold the mask (for that's what it is called, now that it's cut out) up to the camera's film plane to ensure that it will fit top to bottom.
9. Cut away some of the corners from your top and bottom tabs at an angle, to allow the tabs to go smoothly under the film rollers. They don't have to be even, but you should start your cut at the horizontal line and move toward the end of the mask.
10. With the X and other marks you may have made on the "inside" of the paper (keeping in mind that when the mask is mounted, it should look neat), fold your tabs down to a sharp crease along the horizontal line and slide them carefully under the rollers. You may have to tug at the ends of the tabs to get the cardstock to fit firmly against the film plane.
11. If the tabs are a little too long, trim them off, then secure them to the film cone with masking tape. Be neat here, so that the ends of the masking tape won't eventually curl up and get caught in the film.
12. Your mask should not be buckled or crooked as it rests along the film plane. If it does not lie flat, undo the tape from the tabs and make the necessary adjustments.
ADAPTING THE FILM CONE/TAKE-UP SPOOL
1. In the film loading chamber (feed end), affix one foam pad on each side where the 120 spool will eventually rest. If there is a metal tab sticking out to hold the flange, put the edge of the pad against this tab. Test with a 120 spool. It should fit snugly but still turn easily.
2. Take two more foam pads and the one-hole punch, and create a hole large enough to accommodate your 616 or 116 spool shaft. You may have to punch several overlapping holes to do this. It don’t have to be purty, don’t worry. Then take the scissors and snip from the edge of the pad to the edge of the hole, to make something like an open-ended washer.
3. Fit these pads around the spool shaft, peel off the backing, and affix them to the insides of each flange. This will now allow your 120 backing paper to collect on the take-up spool neatly with some degree of light-tightness.
4. If you have a spare 120 spool with an empty backing paper, you can test your work by loading the camera with this dummy film, putting your camera back together again and running it through. If you experience smooth operation, and if the backing paper fits between your newly adapted flanges on the take-up spool, you may have a winner.
ADAPTING THE VIEWFINDERS
You're almost ready to load and shoot, I swear! This next part is easy, and all you need is the Sharpie, the clear cello tape, and your Mark-1 Eyeball (that's Navy talk for guesstimating). The nice thing about the Brownie Target is that it has the "brilliant" viewfinders, so you can get a better idea of what you'll be shooting. Even reduced, which is what you're about to do, the effect is impaired in only a small way.
1. Holding your camera body so that your top viewfinder is horizontal to your point of view, take your fine-point Sharpie and carefully mark a vertical line about 1/3 over from the left. Make another mark about 2/3 over from the left. Now join the two marks at top and bottom to form a drawn rectangle -- do this along the beveled edges of the viewfinder glass.
2. Repeat this action for the side viewfinder, making sure that it is again horizontal to your point of view.
3. Use the clear cello tape to cover your marks so they don't get smudged away (this is why you shouldn't use the "magic transparent" tape, because it's too opaque).
4. For a more permanent fix, you can mask off the center portion of the viewfinders and paint the outside segments. I did this with 2 or 3 coats of a dark gray nail polish, and I think it looks pretty nice.
LOADING YOUR CAMERA
1. Load in the usual way, but keep the following in mind: the leader paper is traveling across a longer film plane and if you're not careful you may fog the film as you're loading it. Keep a finger on the roll to maintain a steady pressure and to keep it from falling out.
2. You may wish to insert the paper leader into the take-up spool and roll up some excess, and then pull it across the film plane to the feed side. This is what I do, while maintaining a steady pressure on the roll on the feed side. I do not let go of the feed spool until the last possible second as I'm putting the camera back together.
3. One of the very cool things I discovered when I first converted a 616 camera to take 120 film is that the backing paper and the 616's film counter window are now perfectly aligned for 6 x 4.5 images! You won't have to change a thing with the film itself.
FINAL WORDS
Well, that's it, I think. There are a few things you'll have to get used to, like remembering to hold your camera vertically for horizontal pictures, and vice versa.
Your converted camera, since you're now taking smaller pictures, has suddenly become a "close-up" camera: you may still have to stand eight feet away, but your focal length has been altered significantly. Do some experimenting with portraiture and see what results you get.
I did mention at the beginning of this article that there are certain steps you can take if your camera's film cone is not the "drop-in" variety. If such is the case, you will still make the mask in the manner described above, but instead of foam pads to take up the space, plastic screw anchors work very well -- just trim them down as needed (and as is the case with the pads, these plastic anchors are very cheap and several may have to be cut to get the right size). You'll find that the rim opening of the anchor will slip easily over the peg of the spring bar.
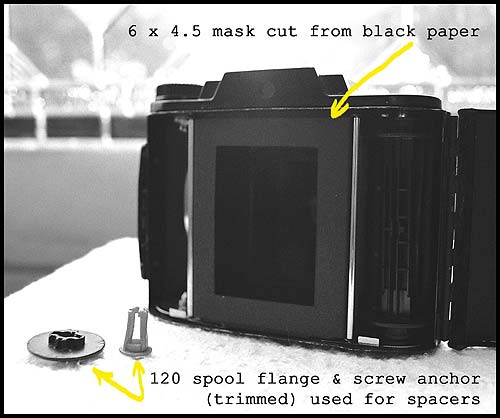
For a folding camera, I did a slightly different version, using plastic anchors on both sides, plus a flange cut from a 120 spool attached to the take-up side (for the knob end). There was a little slippage in the knob, but I got the film across. I have since abandoned this method, preferring to use the 116/616 spool for take-up
About Pete Lutz: Pete was born in the wrong half of the 20th century and tried to make up for it by collecting as many Brownies and old cameras as he could get away with. He is currently not involved in either collecting nor photography, but still loves the idea of it. Pete is spending his free time now as an writer/director/producer of the audio drama podcast series "Pulp-Pourri Theatre", and is formulating a script called 'The Haunted Brownie'.
Find his Pulp-Pourri Theatre podcast on naradaradio.libsyn.com, iTunes and Stitcher.


Back to The Brownie Camera Page
Back to The Brownie Camera Page